VampirateMace
Internet Overlord
Plushie Tutorial:
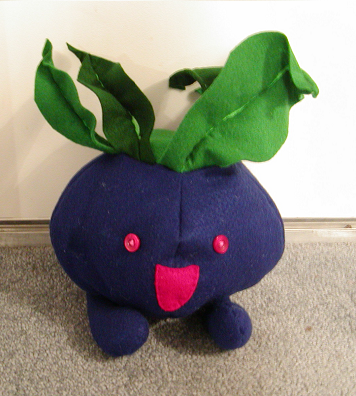
For simple pokemon fan art plushies
In my life-sized pokemon plushie thread, it was suggested that I make a tutorial, so here it is, if it’s good enough that the mods want to sticky it for other’s reference that’s fine. If not I hope it helps someone.
1) Gather info (design/size) and materials.
Materials you will need:
*Felt in the necessary colors (or other fabric, felt needs less sewing in some cases, such as hoppip’s leaves)
*needles and pins
*ordinary thread and embroidery thread
*paper for sketch and/or pattern (newsprint is good)
*pencil
*scissors
*ruler and/or tape measure
*chalk (to draw on fabric)
*eyes (may be buttons, googly eyes, sequins, or more fabric)
*pipe cleaners or wire (if doing leaves, long legs or antenna)
*stuffing (may be polyfill [best], cotton, rice, sand, fabric scraps, or paper scraps)
2) Make your sketch and patterns on large sheets of newsprint.
The Sketch: If you draw well you may just wish to make a line the height of the desired pokemon on the paper and then sketch it to height. If you don’t draw well you may wish to use the grid method. Simply make a small grid over the image you wish to enlarge. Then make a large grid and fill in each space with the lines you see on the small grid.
It’s best to use pencil; I use markers after the first sketch so that it shows up on the camera.

The Pattern: After the sketch I generally just draw the needed shapes on the felt with chalk and cut out the felt. This however is not recommended so here’s some information on cutting out paper patterns to make sure you have the shapes right first. For the body or head of a round plushie measure half the outside circle and then make football shapes that tall. Depending on how skinny or fat your ‘footballs’ are you will need 3-5 of them. For an oval, draw a curved inseam on your sketch and use that to decide the height of the pieces, they will look more like basketballs that have gone flat on one side. You will need 4 ‘flat basketballs’ for an oval. Most other pieces can be cut from basic or simple shapes; hoppip or jigglypuff’s ear for example can be 3 large triangle of red-pink and one small triangle of black. And oddish’s foot can be made from an oval and two half ovals (the half ovals should be as tall as half the outside line of the original oval is long. These pieces should be slightly larger than actual size to account for seams. Leaves should be cut extra wide, I’ll explain this later.

3) Using the chalk draw outlines of the patterns on your fabric and cut out the pieces. You may find that you didn’t have as much fabric as you thought, in which case you’ll need to put the plushie on hold until you can go get more.
4) Sew any main pieces of the face together; remember to sew from the inside (that is the pieces should be inside-out so that the seams don’t show). You can pin seams together as needed, but make sure you remove all pins before sewing the final seam.
[One exception to sewing from the inside is if you use only embroidery thread. If using embroidery thread you can sew inside-in to create a more crafted looking plushie, this is also easier than regular sewing]
5) Add face details, sew in a mouth with embroidery thread, sew or glue on the eyes, ect.
6) Sew rest of body/head seam except for 1 seam, this will be the last seam you sew. You will need it open to hide the knots from attaching any attachment parts like ears and to stuff the plushie. This final seam should be on the back or bottom of your plushie and must be big enough to pull the whole plushie (un-stuffed) through.
A few attachment pieces may be right at seam and can be sewn on in this step. Remember to sew them together and stuff them first. (Remember to sew inside-out)
7) Sew together, stuff, and attach any attachments not sewn on in step 6. Make sure to sew the attachments to the outside, but knot the threads on the inside. (Remember to sew inside-out)
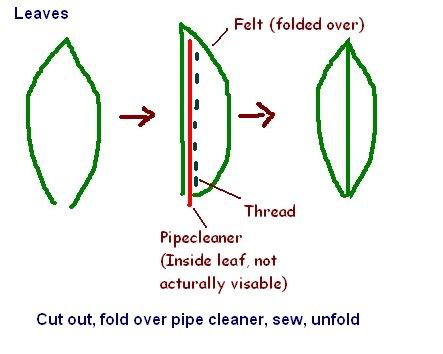
Leaves, My Method: Leaves should be made wider than life-size. Pinch the fabric in the center of the leaf around a pipe cleaner or other wire and sew it in place with embroidery thread. This will create slightly crinkled standing leaves that you can adjust the position of.
8) Turn body and head inside-in. Make sure all pieces are attached and sewn on the way you like. If they are not, cut the threads and reattach them as in step 7. Make sure to remove any pins. When you are satisfied, stuff your plushie through the final seam. Then sew this seam closed (Inside-in of course, which is why we left it on the back or bottom in step 6.)
Do not worry if your first few plushies comes out misshapen or smaller than expected. It just takes some practice.
___
Patterns:
Voltrob
Last edited:
")