• Hi all. We have had reports of member's signatures being edited to include malicious content. You can rest assured this wasn't done by staff and we can find no indication that the forums themselves have been compromised.

    However, remember to keep your passwords secure. If you use similar logins on multiple sites, people and even bots may be able to access your account.

    We always recommend using unique passwords and enable two-factor authentication if possible. Make sure you are secure.
  • Be sure to join the discussion on our discord at: Discord.gg/serebii
  • If you're still waiting for the e-mail, be sure to check your junk/spam e-mail folders

Sprite Tutorial Thread

noobiess

6 different pokemon
Just started with spriting?
Want to try some new spriting technique?
You have come to the right place!

Sprite Tutorial Thread

Below you can find a collection of tutorials which are categorized by technique.
For starting spriters, I suggest you look at the basic tutorials first.
We just started this new tutorial thread, so bear with us if this seems a bit empty.

Because the quality of the tutorials differs sometimes, we also implemented a rating system.
* = avarage tutorial
** = great tutorial
*** = amazing tutorial !advised!

Basic
Basic Paint tools tutorial ~ noobiess **
Making a transparent sprite in GIMP ~noobiess **

Fusion/Splice
Basic fusion tutorial ~Bert **
Advanced fusion tutorial: Patterns & textures ~ Bert **
Splicing tutorial ~ Jappio **

Retype

Revamp/Devamp
Basic revamp tutorial ~ castiboy **
Advanced revamp tutorial ~-aocom v2- ***

Pixel-over
Pixel-over tutorial ~ noobiess **

Scratch
Basic scratch tutorial ~ Renagades *
Basic scratch tutorial ~ SirAquakip **
Advanced scenery scratch tutorial ~ SirAquakip **

3D sprites
Basic concept of 3D sprites ~ noobiess *
Recoloring a 3D sprite ~ noobiess *

Others
Chao tutorial ~ Chaotic Pink *
Userbar tutorial ~ Darknightflames **


Want to contribute?
Want to pass on your wisdom to other sprites? Just make a tutorial and post it in this thread. I will control the quality of it, and if it is good I will put it here.
If you have seen a great tutorial you want to share, this also can be done. To do so, you must ask permission of the maker and then post it here.​
 
Last edited:

Bert

Untitled
Fusion technique: beginner

What you will need:
- MS Paint (Windows) + GIMP (optional), or Paintbrush (Mac) and the knowledge to use them.
- Basic knowledge of recoloring.

What you will learn:
- Choosing the right pokémon for a basic fusion.
- Copy/paste method (in this case, a headswap).
- (optional) Very basic shading adjustment.

Alright, with that out of the way, let’s get started!

Step 1: Choosing the right pokémon for a basic fusion.

This is probably the most important step. If you’ve never made a fusion before, it is best to start easy and keep it simple by choosing pokémon according to the guidelines below. Once you get the basic principles down, you can work your way up and make those really sick combinations in your head become reality.

What to avoid:
- Vastly different pokémon: e.g. Magnemite + Tyrannitar make a poor combination.
- Overly detailed/complicated pokémon: e.g. Rayquaza.
- Overwhelmingly boring pokémon with nothing interesting to fuse. Stuff like Igglybuff, Voltorb should generally be avoided.
- More than 2 pokémon, unless as a color source (see below).
- (optional) Pokémon whose parts are only usable when mirrored, or in other ways altered: while you can get away with this as a beginner, in almost all cases you will need to alter the shading if you mirror a part. If you still want to do this, refer to Jappio’s splicing tutorial (the part where he reshades one of the leaves).

What to look for:
- Pokémon that are anatomically similar: e.g. Growlithe and Elektrike
- Pokémon that are about the same size: if you’re gonna copy/paste, it has to fit. There’s no point trying to swap Aggron’s head with Charmander’s.

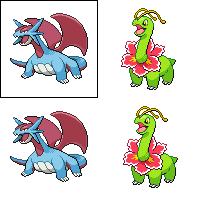
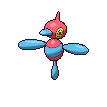
For this tutorial, I had a 5th-gen go at the same fusion I did for a tutorial back in 4th-gen: Salamence + Meganium, with Salamence as the base. They’re both lizard-like (well, Meganium is a dinosaur and Salamence is a dragon, that’s close enough), about the same size and anatomically similar. So open your MS Paint/Paintbrush, get your sprites (I get mine from http://pokemondb.net/sprites) and we’re ready to get started. Notice how I made a 96x96 canvas (the maximum dimensions for 5th gen sprites) beforehand to put my final fusion in, and how I have backup sprites in case I mess up somewhere down the road.

TutBeginner_zpspjumg6gz.png


Step 2: Isolating the parts.

First off, a general pointer: always work while zoomed in, but look at your sprite regularly at normal zoom. Something that may look good zoomed in, may not look good when zoomed out, and vice versa.

Alright, we’re doing a headswap for this one. That means we’re putting the head of one pokémon on the body of another. Other possible ways to go (depending on the pokémon you chose) could range from swapping the arms or adding wings to an earthbound pokémon to putting one upper body + head on another lower body. Regardless the chosen approach, the technique is the same.

Cut off the parts you don’t need on the both pokémon. This is best done while zoomed in, and one pixel at a time until you have enough room to cut off (/erase) the rest entirely at once. Take care not to accidentally cut off part of the outline on the part you're about to move. In this case, I’ve cut off Salamence’s head and wings, and Meganium’s body.


Step 3: Positioning the parts.

Now you want to attach the severed parts to the body.
First off, recolor any white in the part you’re gonna move to a randomly chosen flashy color before you move the part. If you don’t, you may get in trouble when the underlying pixels come through, which can be confusing and time-consuming to fix.
Second, try to position the part as anatomically correct and smooth as you can. If your fusion looks like it broke its neck, you’re doing it wrong. Lastly, try to avoid cluttering of outlines. When possible, try to make the outline of the part you’re moving coincide as much as you can with the outline of the base. It may take a few tries to get it right.

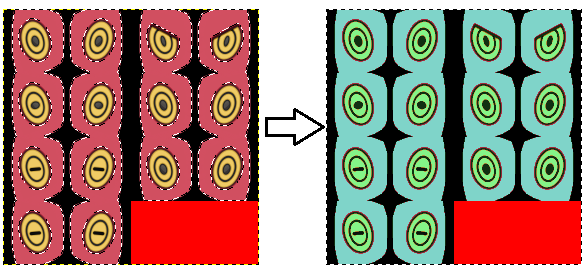
Here’s an example of what happens if you don’t recolor the white:


And here’s how to do it right:
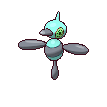
TutBeginner02-right_zpsn2uxc5bp.png


Step 4: Recoloring.

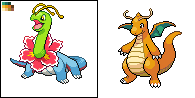
First of all, recolor the flashy stuff back to white. Now I have a Meganium’s head on a Salamence’s body. While this means I am now a legit doctor Frankenstein, it doesn’t make it a fusion yet. The result of your 
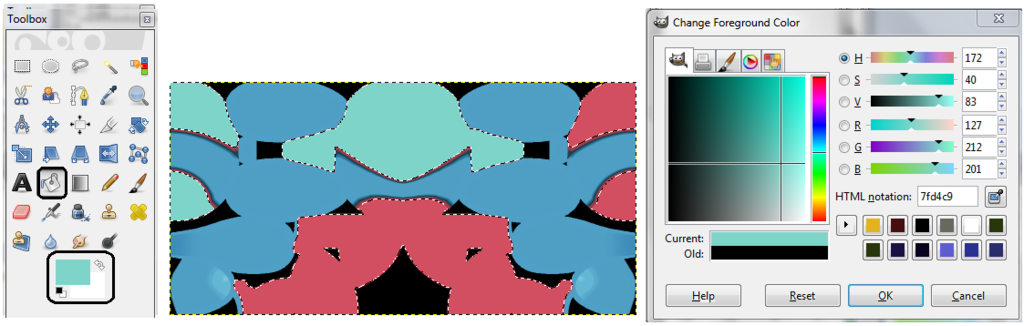
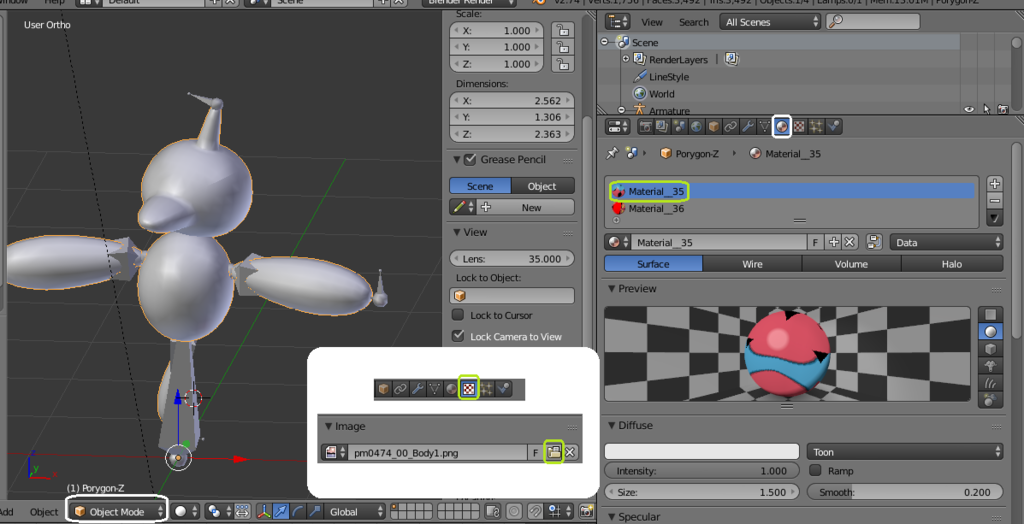
experiments copy/pasting should be recolored to make it a proper sprite. You can choose to use the color palette of the base, the second pokémon or, as I did, a third pokémon. Using a third pokémon will make the fusion seem more complicated, while also allowing larger creativity. You can pick any pokémon you want for this (as long as it has enough colors), but I chose Dragonite. It’s another lizard-like pokémon, with interesting colors imo. Before you start recoloring away, it’s advised to create a color palette in your work station (see upper left on the image below), so you can easily switch between the colors you need.

TutBeginner03_zpsfba9ipw0.png


Start recoloring (you should know how to do this), and don’t forget to recolor the outline as well. You can recolor your sprite however you want, so try to be creative here!

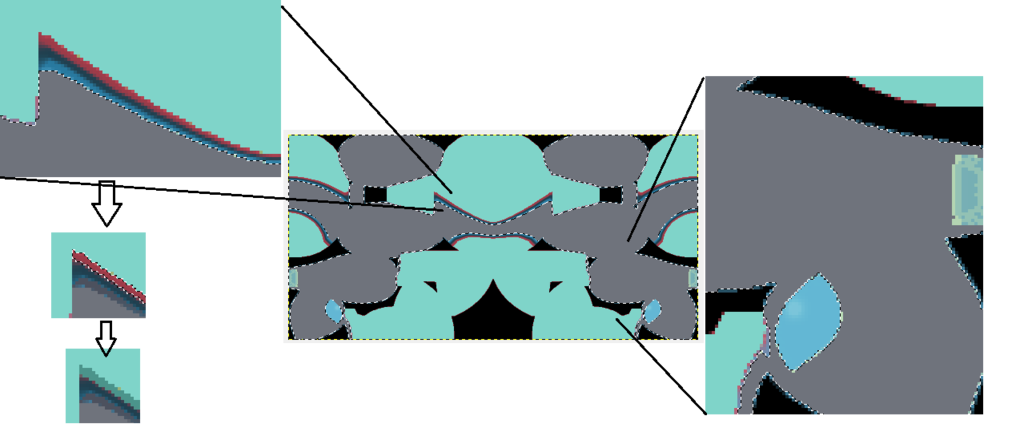
Uh-oh, I ran into a problem. Salamence’s body has one more different shade of blue in the outline that Dragonite’s body. If this happens, don’t panic, just create your own shade. Mine is in the red circle below.

TutBeginner04_zpszxk4myrc.png


There! Looks pretty much done, doesn’t it? Not exactly, actually…
You could stop here, and it would be a perfectly fine fusion. However, there’s one more thing that needs fixing, and why not do that while we're at it?


(optional) Step 5: Basic shading adjustment.

The big thing you have to realize here is that you have interfered with a pokémon’s anatomy, which can sometimes result in shading that needs adjustment. In this case, the added neck flower of Meganium’s head should block the light on Salamence’s lower body. Lucky for me, this is easy to repair: I just recolored the whole thing to the darkest shade. Keep in mind that the fix is not always easy. Depending on how much you altered the anatomy, you may face bigger problems. However, since this is a beginner’s tutorial, I won’t elaborate on that here. (Actually to be fair, the shading below should also extend a little bit onto the orange part of the body where the flower blocks the light. However, I'm only trying to convey a message here, so I'm leaving it the way it is).

Altered shading:
TutBeginner05_zpszjttowcr.png


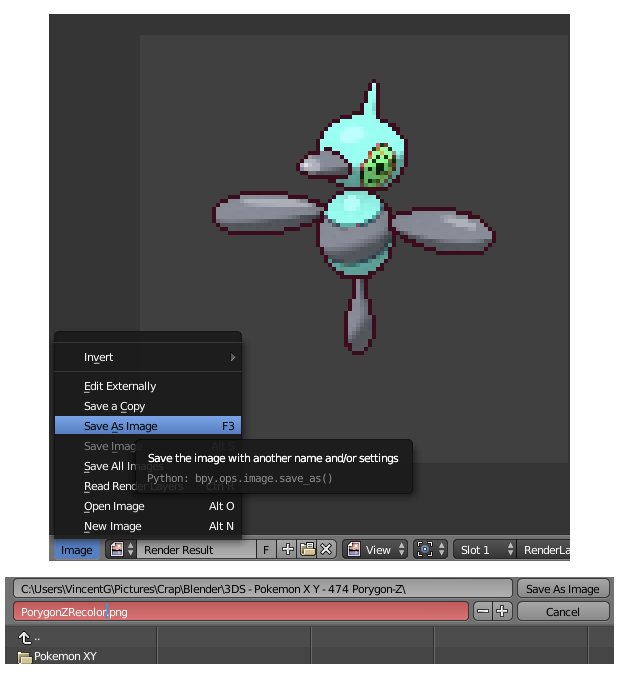
Now all we have to do is get rid of the leftover crap (color palettes, stray body parts, etc...) and WBG the result. If you use MS Paint, you will have to use GIMP or something similar to do this. For Mac users, Paintbrush supports transparancy on itself so you won’t need additional software.

Final result:
TutBeginnerFin_zpsyyniv1cc.png


Intermediate and advanced level tutorials hopefully coming soon. :p
 
Last edited:

Bert

Untitled
Fusion techniques: advanced

What you will need:
- MS Paint (Windows) + GIMP (optional), or Paintbrush (Mac).
- Experience with basic spriting.

Covered in this tutorial:
- Alternative methods to fuse pokémon sprites.

Note that this is NOT a step by step tutorial like the beginner one. This post is meant to give an overview of some more complicated fusion methods by showing and commenting on examples. If you can barely recolor a sprite, this is not what you’re looking for right now.

Introduction

If you read the beginner tutorial and gave the copy/paste method a few tries, you should be able to produce very acceptable fusions by now. However, with enough practice, you may start to feel somewhat held-back in your creativity by the restrictions of said method. Parts don’t always fit, the two pokémon you would really love to fuse don’t go together well, etc… This guide is meant to provide an answer to those restrictions and set you on your way to more complex fusions.

The potential of patterns and textures

Patterns provide a relatively easy way out to transfer part of one pokémon’s ‘identity’ to another. Let’s clarify with a fairly simple example:

Suicune.png


A fusion between Corsola and Suicune. At first sight, it looks okay. It’s obvious which pokémon were used, and Corsola doesn’t have that much more to offer besides its… coral…-ish… things. Or does it? Notice how Suicune’s diamond-shaped pattern is still present. Corsola, however, also has a pattern of its own, which can be used to replace Suicune’s pattern, giving the following result:
corsola.png
->
PattSuicuneFinal_zpst5zhkczh.png

In my opinion, this looks way better. Corsola’s pattern gives the fusion an extra dimension, and a much more professional feel. Notice how the pattern is not exactly identical to Corsola’s. The division between the white and pink of the body is vertical, instead of horizontal, and I added some pink ‘bubbles’ to the right side as well. The bottom line is that you can play around with a pattern, and make it fit your fusion’s needs without losing its identity.

Textures are not the same as patterns. The main difference is that patterns usually don’t require edits to the shading, and textures do. An example of a texture could be fur, or steel. Basically a texture is ‘what it’s made of.’ Textures come in handy when fusing two pokémon with vastly different bodies. Armaldo and Magcargo, for instance, may be challenging to fuse, since one is an animal inside an exoskeleton (presumably chitin), while another is a magma snail. The following sprite is a mere recolor of Armaldo to Magcargo’s colors, with the exception of the feathers being replaced with fire:

TextArmaldoRecolor_zps2ydhgstk.png


As you can see, it doesn’t look like a magma pokémon yet at all. This is where textures come in. I went over the armor from top to bottom, slowly turning the smooth chitin surface to loose pieces of rock held together by magma. Notice how the shading of the several chunks of rock is very different than the shading of one smooth surface (the original armor)! Likewise, the ‘skin’ parts of Armaldo were turned into magma, simply by adding lava bubbles and editing the shading a little bit (I removed most of the highlights since lava doesn’t really reflect sunlight in my mindset, plus this emphasizes the bubbles). When zoomed in, you can see that all I really did here was mimic the textures on Magcargo, and place them on Armaldo:

TextArmaldoClose_zpshe29adcd.png


Once you try it, you’ll find it’s really not that hard. Also notice how I completely ripped off Magcargo's flame texture.
The final result is obviously much better than the recolor above:
TextArmaldoFinal_zpsrmrffxfi.png


Some more general tips to using patterns and textures:

- Patterns can vary from small and simple to large and extremely complicated. When trying this method out, I advise you to start with basic ones. Good choices would be Togepi, Spinda, Pikachu. Relicanth is also one of my personal favorites, both for his awesome pattern, and the 'cracked rock' texture of its head.
- Textures are considerably harder to pull off than patterns. As stated above, the main difference is that textures will usually require edits to the shading.
- Always keep the shading in mind. Steel reflects light in a very different way than skin does, or wood, or cloth, or … When in doubt, either check real-life pictures of the texture you want to shade, or refer to an official pokémon sprite with the same texture. Don’t forget the outline either! Some textures generally have lighter outlines (fur, for example), while others will be darker (rock).
- Generic patterns and textures are a great way to retype a pokémon. With some minor edits (like removing the obviously copy/pasted lava thing under its head), the above Armaldo/Magcargo could easily be presented as a Fire/Rock Armaldo.
- Playing around with patterns and textures is also a great way to improve your scratching skills!

I’ll add more when I think of them. :p
 
Last edited:

noobiess

6 different pokemon
Added 3 tutorials:
- for adding transparency
- making a basic scratch sprites
- advanced scratching

enjoy ^^
 

noobiess

6 different pokemon
Recoloring a 3D sprites

Most of the people reading this, are probably able to recolor a regular 2D sprite.
With some basic knowlegde about blender (and Gimp or Paint), 3D sprites can easily been recolored.
When familiar with the program, this might take about 10 minutes or so. Otherwhise, I'm guessing around 30-45 minutes.

Intro to blender and the model
Here we will start with the 3D sprite of porygon Z, which can be found here
This is a 3D model that is retrieved from the game (for here), that is further prepared by me.
The file you have to open is the ".bend"-file with blender, and this is what you will get:
Basic%20view_zpstz5z1vvd.png

You will see the 3D model, the skeleton, the camera and the light source.
What this is, and how you come to this point, will not be explained in this tutorial since it isn't important for the recoloring of the sprite.
What is important is that by "rendering" you will see the image from the angle of the camera, like you "take a photo". This is your 3D sprite!
It will look something like this:
RenderedImage_zpsjcus7br8.png

As you can see it has colors and texture in the rendered model. This is because there are put up there by a texture image.
You can find them in the zip-file:
FilesTexture_zpscio8ukar.png

As you can see there is one for the body and one for the eyes.
The body parts are a bit scrambled over the file. In blender the parts are 'put on the model' when they are rendered.
By changing the colors in the texture file, you can change the colors in the rendered image.

Changing the texture
Changing the colors can be done in many kinds of programs, like Paint. I prefer to use Gimp.
In gimp you can make a selection on color.
The treshold is here important. If the treshold is 0, only the color you selected will be in the selection. If it is higher, colors that resemble on the chosen color will be added to the selection.
Selecting%20colors_zpsz9hwjbgf.png

In contrast with 2D sprites, it is best to choose a treshold that is above 0.
Once you made the selection you can just start chenging the colors. This can be done with a 'bucket' (see below) or a big brush.
Changing%20colors_zps9cf42phf.png

Once you have done every big surface, you'll see that some of them are not changed yet:
Recoloring_zps2zkimnrt.png

With a similar technique (and by playing a bit with the treshold) you can also change them into a preferred color.

So once you changed every color, you can do the same for the "eye-texture-file".( Here only the first pair of eyes are important, but since changing the color of one pair of eyes is as much work as changing all of them, I did all of them.)
Eyeschange_zpswt4iowut.png


You can save them as .png-file by clicking "file" and "export as". You will get a screen with different kinds of settings, but you can just click 'export'.
When you close the Gimp-file is will say that you didn't save the Gimp-file. But don't worry, you can do that, since you only need the .png-file.

Putting the new texture on the model

Now to put the new recolored texture on the model, just must open blender again.
Click with the right mouse-button on the 3D model (this must be done in "object mode"), and a yellow line around will appear.
Go to materials and click on material 35 (the one of the body). Then go to textures and go to "image". Here you can change the file of the texture.
So change it to your recolored texture-file.
Do the same or materal 36 (the one of the eyes).
changing_zps5ilxpfy2.png


Now when you render it, it will have the new color! Your recolor is done!
To save the 3D sprite as a .png file, go to "image" and "save as image".
Save%20image%20as%20png_zpscvxvuylu.png


You will get your 3D sprite with a grey background. Make it transparent, and viola! You're done!

PorygonZ_zpsn6z5skxo.png
-->
PorygonZRecolor_zpsygbcw6hz.png
 
Last edited:

noobiess

6 different pokemon
Basics of 3D sprites

Here is just a quick tutorial on the basic concepts of 3D sprites, to give you an idea how 3D sprites are made.
If you are new to 3D modelling, I advise to read this through to get how 3D sprites work. To actually make them I advise you to look for other tutorials.

3D sprites are made in 3D programs, like Blender and Maya. Blender is a free program that is quit easy to use and can do most things that are necessary to make a 3D sprites.
So I advise you to use this program. You can download the most recent version here .
Since it is really difficult to explain the basic tools of Blender in a post, I advise you to use videotutorials like this and this.

As example, we will use this 3D sprite:
PorygonZ_zpsn6z5skxo.png

You can look at it here.
(the .blend file you can open in blender)

Wireframe
Probably the most important part of a 3D sprite is the wireframe of the sprite. This is the body of the sprites:
Wireframe_zpsbalackjg.png
Wireframe2_zpszitg2rz5.png

It consists of a lot of small squares or triangles that make up the model.
These are mostly made by adjusting basic figures likes cubes and cylinders.

Material and texture
To give the sprite a color, a material can be added. Here different kinds of properties can be adjusted, like the shading (for example realistic or more cartoony) and the colors.
To add more detail to the sprite, like eyes, mouth and patterns, textures are added.
Texture_zpshhehggab.png

As a first step, the surface is turned into (a) 2D surface(s). This is done marking edged to make 'cuts'. Like an orange, the surface can be peeled off into a 2D surface.
I pattern can be added to the 2D surface by another drawingrpogram (f.e. paint).

Rigging and Animating
To repose the model easily, a 'skeleton' is made.
(Mostly wireframes are made the easiest way possible. So this is without any unnecessary bending. So for example, ekans would be just made with a straight-going body, even thouh that is not its natural pose)
Rigging_zpsjsdgydgk.png

Yeah maybe porygon Z wasn't the best example...
By moving and turning the bones, the model automaticly changes too. This was it is easy to deform the model into the wanted pose
Also different kinematics could be add, like making something move like a leg, to make the movements more natural.

Additionally, the model can be animated. This is done by placing different properties of the models (a rotation or movement of a bone, the placement of the model,...) into a timeframe.
Then is automaticly goes from the first pose to the next in a smooth way.

Rendering and post-processing
When working in the 3D view of blender, you just see the model you are working with. You can choose whether this is in a wireframe, as a solid, with or without textures, with the bones visible,... .
To get an actual sprite, there must be rendered. This is actually 'a photograph you take' (or video you make) with a camera you have put into the 3D space.
And just like a photo, you also need some kind of light source. This also adds the shading of the sprite.
rendering_zpsdfxqqgnp.png

This turns the 3D model into the actual 3D sprite.

You might have already wondered why there is an dark outline, which is typical for pokémon sprites, even though I didn't mention something yet that would make that.
Well this can be done by the post-processing. There are some other features that can also be changed, but those are less important for this tutorial.

So that was it! I hope you kind of have the feeling now how the proces of making 3D sprites works.
Of course, the specifics are not discussed here, it is just for the general idea.
But if you are on making your own 3D sprite, I suggest you check out some other more specific tutorials.​
 
Last edited:
Top