Warfare
liverliverliverliver
(READ BEFORE THINKING ABOUT MAKING A POST) just a few notes:
This is not the PMD help thread. This is not the Wonder Mail request thread. This is not the Recent Happenings thread. In fact, this is to lessen the amount of "help" posts in this forum. yarly, anyone will report you if they have to because we have threads for these! USE THE CORRECT THREAD INSTEAD!
Let's not spam this thread up like back in 2006 with Meganium Ex's and my PMD1 Strategy Guide. It's the main reason why Erik closed it.
The Recruit Dex is incomplete. The new 4th generation Spin-Off dex made this section obsolete because it lolcame out before I could complete this. But, oh well, lazy person's reference.
Sorry, the official guide isn't that generous, so we're not 100% accurate on our lists. The rest is based on what I and your generous fellow SPPf members experienced from game play. There may be a few things to add to the guide, so notify me via PM.
INDEX
Introductory and Miscellaneous things
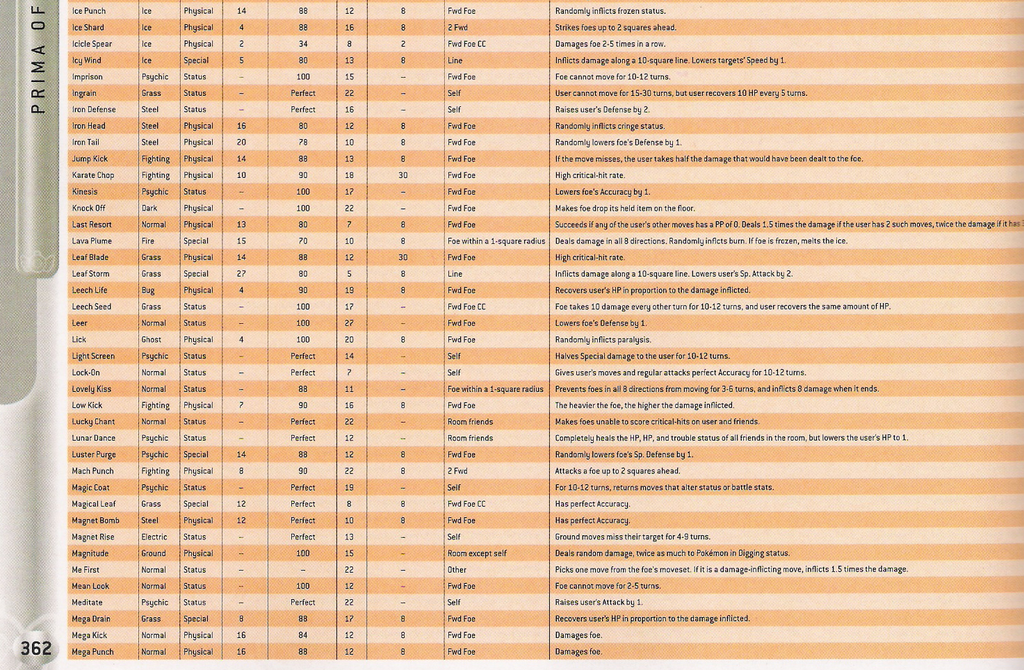
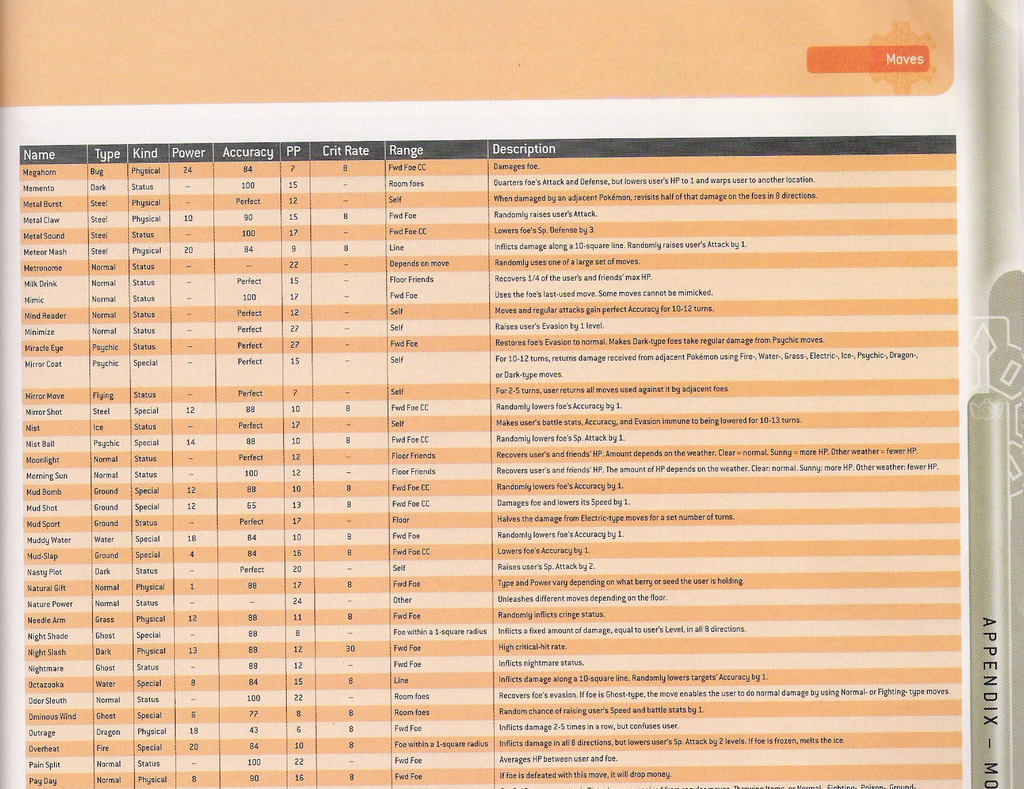
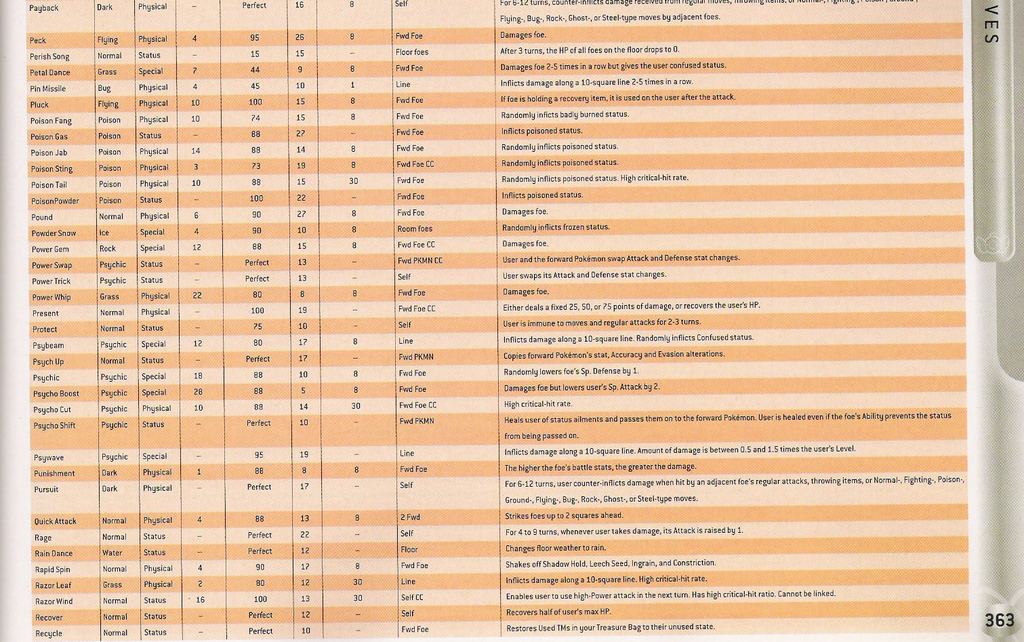
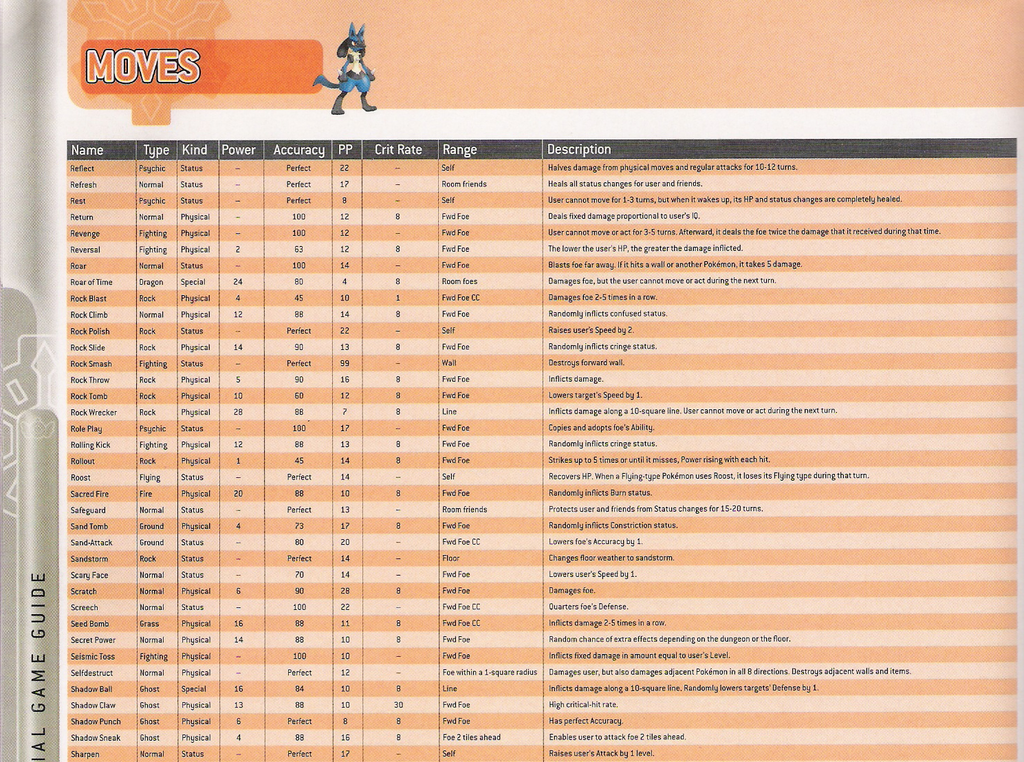
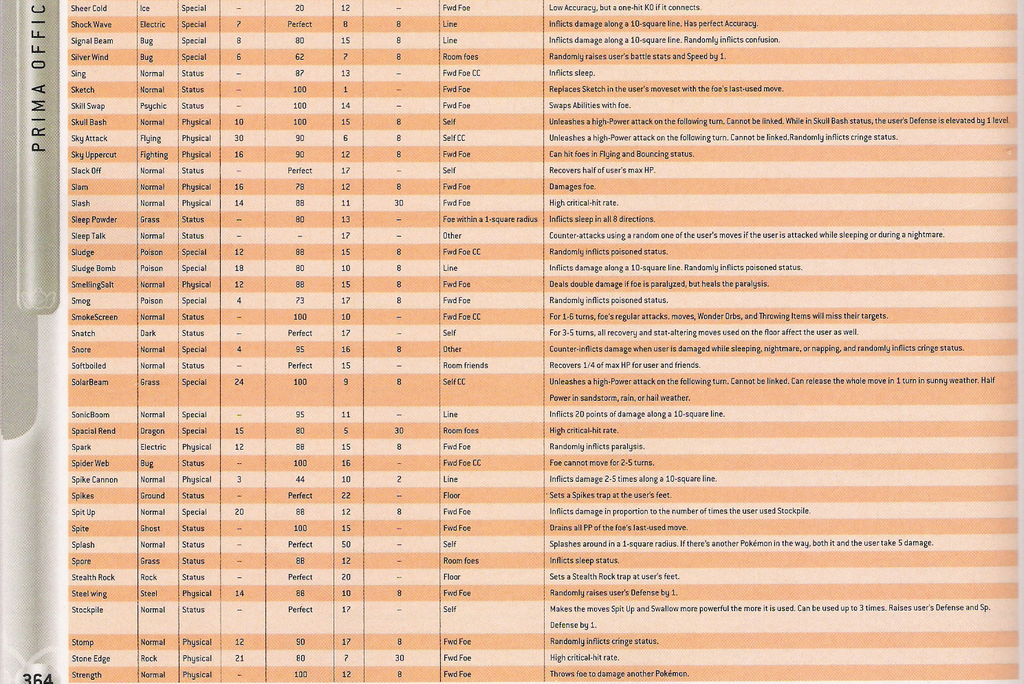
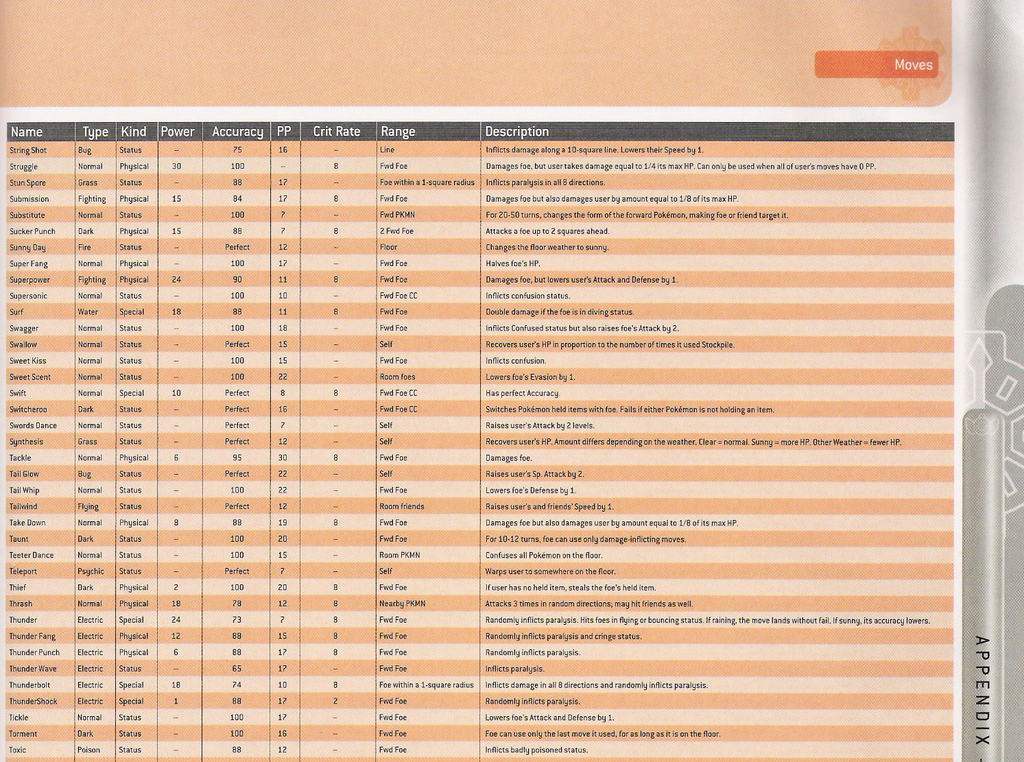
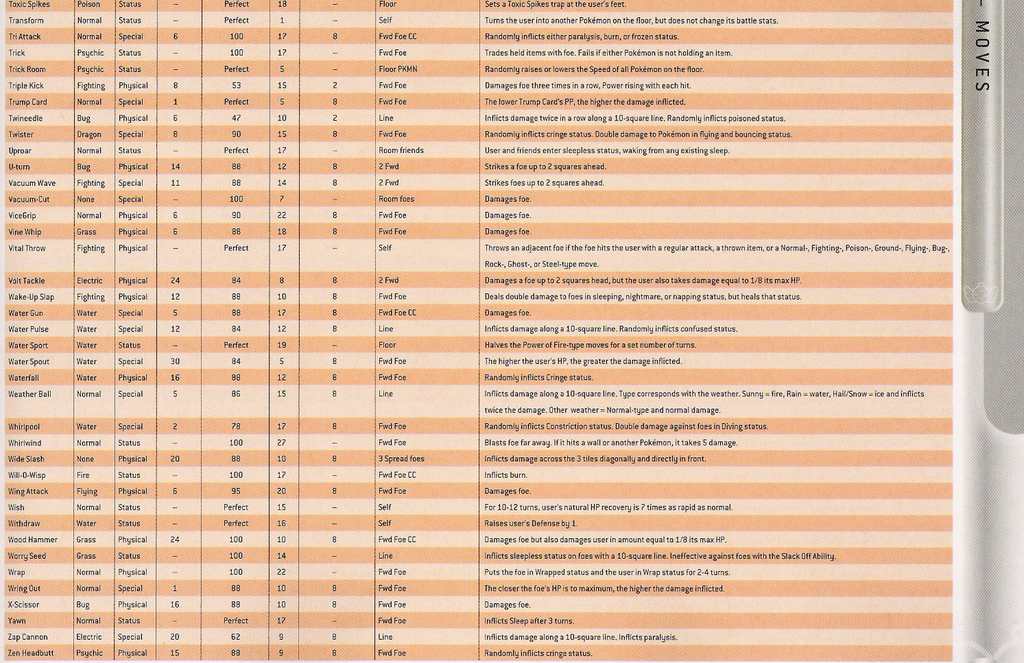
Miscellaneous continued, Personality Quiz Guide, Boss Battle Strategies, Attack Dex(IMAGE FILE WARNING)
Recruit Dex by Dungeon *INCOMPLETE* and Wonder Mail section(PLEASE READ)
Starting the Game With Your Partner
When beginning your game, you start out with a personality quiz. You are requested to answer them honestly, but not all people would do so! Especially when the results of the test lean towards the Pokemon you will become in the game. In this game, there are no gender exclusive Pokemon. That means all 16 starter Pokemon are available to males and females.
You get to choose your partner. The partners are apparently the other starters. You may not choose any Pokemon of your type or of a Normal type. Also, there seems to be changes in options with choosing partners as well.
Auras
After you are told who you are most like, you will be asked to place your finger on the touch screen and hold it there so they can get your aura. However, the stylus would work fine as it will all do the same thing. Your aura is [most of the time, but not always] based on the color of the main menu of your DS start-up screen. Bonuses will be granted if you have a colored ribbon matching your aura. Others will be useless.
List of Auras:
A Refreshing Green
A Vivid Pink
A Mystic Purple
A Subdued Brown
A Cool Sky Blue
A Clear Aqua Blue
A Gentle Mint Blue
A Stunning Orange
An Uplifting Pink
An Energetic Yellow
An Elegant Violet
A Brilliant Green
A Stately Silver
A Deep Green
A Smart Marine Blue
A Fiery Red
Rescue Missions and Your Team Rank
When you begin the game you’ll be at Normal Rank, the lowest rank possible because you just started your rescue team. There will also be a low amount of items you are allowed to hold in the Kangaskhan Storage. You can then begin getting missions from the bulletin boards located in the Guild’s first Sublevel.
The left board is just like PMD1: rescue missions, escorts and possibly new dungeons to be unlocked. The right one are missions where you find and defeat outlaws and receive the bounty on their head. The Poke money prizes may seem a lot, but you only get ten percent of the money. Completing a mission will always earn you “Rescue Points”. The more points you earn the higher in rank your rescue team will become.
Rank: Points needed | items allowed in Storage
Normal Rank: - | 64 items
Bronze: 100 rescue points | 96 items
Silver: 400 rescue points | 200 items
Gold: 1600 rescue points | 320 items
Diamond: 3200 rescue points | 480 items
Super: 6000 rescue points | 560 items
Ultra: 10000 rescue points | 640 items
Hyper: 15000 rescue points | 800 items
Master: ? | 1000 items
Secret Rank: After you graduate, do a job and then go on to the second morning. Then, talk to Mr. Mime and rescue Scizor from the Crevice Cave to be granted Secret Rank.
Dungeon Information
Each dungeon has a set amount of floors each. When you go into the same dungeon several times, you notice that the layout is different even though they were in the same dungeon. That's because the floors are changed each time to add challenge to the game.
Each space that you move onto is considered a turn. Your foes will then take their turn. If you meet and then have to fight against an enemy Pokemon, you will take turns just like previous games except you always go first. However, between each turn you can take a moment to think of what you’ll do next, whether to move during the fight, or use an item. Attacking, moving, and item using uses up a turn.
Partners can also be set to a certain tactic. If you go and select your Pokemon through the menu under the “Team” section", you then go to “Tactics” and choose what you want them to do. They can go and chase enemy Pokemon, stay where they are, or more.
Another part to maneuvering through dungeons is the hunger which is displayed on the opening section of your menu. Moving around too much can make your Belly drop down. When your “Belly” status starts to get low, you will be told you’re getting hungry and that you need to eat. Otherwise you’ll begin to lose 1 HP per turn and eventually could faint in the dungeon.
Certain items are essential when traveling through a dungeon. Items like the Oran Berry to heal your HP and Apples are essential for filling the “Belly” of your Pokemon. Pecha, Rawst, and Cheri Berries can heal certain status like paralysis while Gravelrocks and Blast Seeds can harm other Pokemon. Rare items like Reviver Seeds and Max Elixirs are also crucial in certain situations, so it is important to stock up before entering a dungeon.
If the rescue team leader faints in the dungeon, then you will be immediately transported out of the dungeon with a failure. This will result in you losing half your items and all your money that you have with you, so save your game often. However, the SOS option allows you to prevent this and will become available soon after starting the game.
Recruiting Pokemon
At your Guild’s first Sublevel, there is a desk at the bottom right. After you complete the mission at Waterfall Cave, Chimecho will open a “Chimecho Assembly” where you will be able to put Pokemon you have recruited on your team or on standby.
With the release of PMD2, there is a new system of recruiting Pokemon. Sadly, it has become quite easier. As some people notice, evolutions of Pokemon can now be recruited at an easier rate than in PMD1. No Friend Areas are required as well. You do not need any spaces in your party as the Team Badge will return them to Treasure Town. If you do have a slot and recruit a Pokemon, they will accompany you for the rest of the dungeon. Even if they faint, they will go back to Treasure Town and they will still be on your team.
However, things have not changed still. You, as the leader, must land the final blow on the Pokemon for there to even be a chance for it to be recruited. You also must be adjacent to the Pokemon whether it be diagonal or directly in front.
SOS Process
If you happen to faint in a dungeon, you would normally lose some items and all your money. You can prevent that situation by sending an SOS distress call. Your game will be Quicksaved then you'll be at the main menu. When being rescued by someone, DO NOT resume gameplay, because that is only for when you're giving up on being rescued.
When sending an SOS, go to "Friend Rescue" then choose “Get Help”, and you will then be able to choose Wireless, Wi-Fi, or Password. Either way you will be sending an SOS so that somebody may rescue you. When the rescuer receives the mail, they may start rescuing you by going to the “Friend Rescue” option in the main menu, then to “Rescue Mail” and then “Receive SOS Mail.” From there, they will be able to choose their method of receiving mail. The rescuer will then go to “Go Rescue” option in the main menu and perform their duties there. The rescuer must go up the same dungeon with the same floor layout and try to get to the floor you fainted on. When they reach the floor you fainted on, they must find a "Rescue Point" which is a red flag square tile.
When your rescuer sends an A-OK mail via Wireless, Wi-Fi or Password, you are allowed to revive your team by going to "Friend Rescue" then “Get Help” then "Recieve A-OK". If it is by password, you must go to "Friend Rescue" then "Recieve A-OK" then type in the password that was given. You can send a Thank-You mail right away to the rescuer with an item in your Storage or not or you can send it afterwards. When you're done recieving A-OK mail, you may resume your game with all your items and money.
Wonder Mail
Wonder Mail is the code you can use to obtain or give missions via Password or Wi-Fi. When you start up the game, select "Wonder Mail" and input the code or prepare for communication, then you immediately receive a new mission added to your job list. There are a few missions that can only be obtained through Wonder Mail and these special missions come with unique rewards like unlocked Pokemon, or unlocked dungeons.
If you want to give someone the Wondermail code to a mission, just copy down the Wondermail password of the mission by looking at the Mission Info before accepting the mail. Then give that code to the person. They can put it in and receive the mission too.
Evolution Process
You are not able to evolve until after graduating from the guild. After you accomplish that, you continue on as you stumble upon a pond where the evolution processes take place. Apparently, your starter and partner will not be able to evolve until you unlock Marine Resort. That is only part of the storyline.
Gummis
Gummis play an important role in the game. It makes the Pokemon eating the Gummi smarter, thus raising IQ. You might even gain IQ skills. If you want to switch IQ skills, you go to the Pokemon's information then go to the IQ List, then set an IQ skill. Dual type Pokemon gain IQ much faster than single type Pokemon. Also, benefits of feeding a Pokemon a Gummi will raise stat point(s) as well as IQ and Belly.
Pokemon Types that like certain Gummis
Black: Dark
Blue: Water
Brown: Ground
Clear: Ice
Gold: Psychic
Grass: Grass (Ironic)
Gray: Rock
Green: Bug
Orange: Fighting
Pink: Poison
Purple: Ghost
Red: Fire
Royal: Dragon
Silver: Steel
Sky: Flying
White: Normal
Yellow: Electric
*Note: Wonder Gummis raise the IQ of all types
PMD2 and PMD1 Differences
As some of you may have [obviously] noticed, there are differences in PMD2 compared to PMD1. This will be split up into subsections explaining these differences.
lulz. My Torchips follows my Treekipz.
After you finish the storyline in PMD1, your partner does not follow you anymore and you may walk as your current team leader in town. However, in PMD2, your partner follows you every time and even though you may have team leaders changed, you will still be your starter.
Well, there's the evolution place, but I can't evolve yet!
When Luminous Cave came out in PMD1, you could just evolve any Pokemon under the qualifications. In PMD2, you can't evolve your starter and partner for a reason and you must recruit Palkia
Sentry Duty!
PMD2 has a minigame! A mediocre one at best, lulz. There are six Pokemons' footprints you have to identify. Four choices are presented to you and you are pressed under a time limit. Sure, you can look up the footprints in a Pokedex or something, but there's still a time limit and more points would be rewarded. Just keep practicing. Sentry duty is a great way to gather up some Poke or Reviver Seeds you may need.
I want that IQ skill! ):
There's the possibility that you know it takes 'x' stars of IQ to get that IQ skill you've wanted, and you're already there! However, each Pokemon falls under a specific IQ group which means they will only learn certain IQ skills. In total, there are ten groups.
Miscellaneous
Dungeon Floors
Beach Cave: 4 + 1
Drenched Bluff: 6
Mt. Bristle: 9 + 1
Waterfall Cave: 8
Apple Woods: 12
Side Path: 5
Craggy Coast: 9
Rock Path: 5
Mt. Horn: 14
Forest Path: 5
Foggy Forest: 11
Steam Cave: 8 + 7 + 1
Amp Plains: 10 + 9 + 1
Northern Desert: 15
Quicksand Cave: 10 + 10 + 1
Crystal Cave: 11
Crystal Crossing: 13 + 1
Chasm Cave: 8
Dark Hill: 15
Sealed Ruin: 8 + 6 + 1
Dusk Forest: 8
Deep Dusk Forest: 12
Treeshroud Forest: 20
Brine Cave: 9 + 5 + 1
Hidden Land: 15 + 8 + 1
Temporal Tower: 13 + 10 + 1
Serenity River: 7 + 1
Landslide Cave: 12 + 1
Lush Prairie: 5 + 1
Tiny Meadow: 4 + 1
Oran Forest: 4 + 1
Mystifying Forest: 13 + 1
Blizzard Island: 20
Crevice Cave: 10 + 4 + 1
Surrounded Sea: 19 + 1
Miracle Sea: 18 + 4 + 1
Aegis Cave: 3 + 1 + 3 + 1 + 4 + 1 + 5 + 1
Mt. Travail: 19
The Nightmare: 17
Spacial Rift: 15 + 9 + 1
Dark Crater: 15 + 14 + 1
Concealed Ruins: 29 + 1
Marine Resort: 18 + 1
Lake Afar: 24 + 1
Happy Outlook: 19 + 1
Mt. Mistral: 19 + 1
Shimmer Hill: 17 + 1
Lost Wilderness: 17 + 1
Midnight Forest: 24 + 1
Last Maze: 48
Zero Isle North: 74 + 1
Zero Isle East: 39 + 1
Zero Isle West: 39 + 1
Zero Isle South: 98 + 1
Chapter Log *SPOILER WARNING*
Chapter 1
Chapter 2
Chapter 3
Chapter 4
Chapter 5
Chapter 6
Chapter 7
Chapter 8
Chapter 9
Chapter 10
Chapter 11
Chapter 12
Chapter 13
Chapter 14
Chapter 15
Chapter 16
Chapter 17
Chapter 18
Chapter 19
Final Chapter
Post-Ending 1
Post-Ending 2
Post-Ending 3
Post-Ending 4
Post-Ending 5
Post-Ending 6
Post-Ending 7
Adventure Log List *SPOILER WARNING*
1/6
? Pokemon that joined you.
? Kinds of Pokemon battled.
? Moves were learned.
? Kinds of items acquired.
? Dungeons cleared.
? Times fainted in dungeons.
? Friends were helped.
? Thieving attempts succeeded.
2/6
? Pokemon evolved.
? Pokemon Eggs hatched.
? Record # of one-floor victories.
Discovered the Hot Spring.
Discovered the Fogbound Lake.
Returned from the future.
Prevented the planet's paralysis.
Graduated from Wigglytuff's Guild.
3/6
Solved the mystery of the Aegis Cave.
Stopped the evil ambition of Darkrai.
All training completed.
Zapdos joined the team.
Moltres joined the team.
Unown joined the team.
Raikou joined the team.
Entei joined the team.
4/6
Suicune joined the team.
Lugia joined the team.
Ho-Oh joined the team.
Regirock joined the team.
Regice joined the team.
Registeel joined the team.
Latias joined the team.
Latios joined the team.
5/6
Jirachi joined the team.
Deoxys joined the team.
Uxie joined the team.
Mesprit joined the team.
Azelf joined the team.
Dialga joined the team.
Palkia joined the team.
Regigigas joined the team.
6/6
Cresselia joined the team.
Fione joined the team.
Manaphy joined the team.
Darkrai joined the team.
Some of these were picked up from people that translated the Japanese version, so they may or may not be word-for-word. Just a note.
Traps
Mud Trap: Randomly lowers any stat except Speed by 1
Sticky Trap: Makes one of the items being held or in the Treasure Bag sticky and unusable.
Grimy Trap: The food in your Treasure Bag may become grimy.
Summon Trap: Enemy Pokemon are randomly placed in the room
Pitfall Trap: Receive damage and sent to the next floor
Warp Trap: You are warped to a random spot on the floor
Gust Trap: You're blown in a random direction in a set number of tiles
Spin Trap: Confused status
Slumber Trap: Sleeping status
Slow Trap: Lowers Speed by 1
Seal Trap: One of the moves cannot be used on the floor
Poison Trap: Poisoned status
Selfdestruct Trap: Inflicts half of your current HP as damage for the 8 tiles it covers
Explosion Trap: Inflicts half of your current HP as damage for the 24 tiles it covers
PP-Zero Trap: A random move of yours gets drained to 0 PP
Chestnut Trap: Receive 10 damage
Pokemon Trap: All items in the room turn into Pokemon
Spiked Tile: Receive 20 damage
Stealth Rock: Up to 1/8 of max HP is inflicted as damage
Toxic Spikes: Receive 10 damage and poisoned status
Trip Trap: Your held item is dropped
Weather Conditions
Cloudy: All moves except Normal-type deal 3/4 damage.
Fog: Damage from Electric moves are halved.
Hail: Non-Ice Pokemon receive 3 damage every 10 turns Activates Snow Cloak ability.
Rain: 1.5x damage for Water moves. Half for Fire moves.
Sasndstorm: Non-ground/rock/steel Pokemon receive 3 damage every 10 turns. Activates Sand Veil ability.
Snow: Ice Pokemon gain one Speed.
Sunny: 1.5x damage for Fire moves. Half for Water moves.
IQ Skills
Apparently, Pokemon are fit under different IQ groups which mean that they have certain IQ skills that some other Pokemon do not have access to. There are new IQ skills as well.
IQ skills common to all groups:
Course Checker (Base): Does not use attacks when a wall or ally is in the way.
Escapist (Base): The Explorer Badge can be used to leave the dungeon.
Item Catcher (Base): Can catch a thrown item to hold.
Item Master (Base): Can use and throw held item.
Exclusive Move-User (Base): Uses moves and not regular attack.
Nontraitor (0.5*): When confused or cowering, Pokemon will not attack friends.
Status Checker (0.5*): Does not use moves that inflict status that a foe may already have.
The Others:
Dedicated Traveler (Base): Moving is first priority over using attacks and items.
PP Saver (0.5*): Sometimes gets to use a move without draining PP.
Cheerleader (0.5*): Raises Attack and Special Attack of friends by 1.
Efficiency Expert (0.5*): Attacks Pokemon with the lowest HP first.
Acute Sniffer (0.5*): Lets you know the number of items on the floor.
Type-Advantage Master (1*): Raises critical hit rate of type-effective moves.
Brick Tough (1*): Permanently adds 10 to max HP.
Self-Curer (1*): Shortens required turns for Pokemon to heal from status.
Bodyguard (1*): Takes damage in place of friends who are low on HP.
Power Pitcher (1.5*): 1.5x damage inflicted with throwing items excluding Gravelrocks.
Survivalist (1.5*): Restores more Belly stat with foods and may not be affected by Grimy Foods.
Weak-Type Picker (1.5*): Targets foes with good type compatibility.
Wise Healer (1.5*): Raises effectiveness of HP-recovery moves/items.
Coin Watcher (1.5*): When Poke is picked up, 1.2x will be received instead.
Deep Breather (2*): Recovers 1PP to a random move upon entering the next floor.
Wary Fighter (2*): Steps back one tile when it misses a move.
Practice Swinger (2*): Raises attacks stats by 1 only for the turn after a move misses.
Hit-and-Runner (2*): Sometimes cancels foe's counter-attacks.
Concentrator(2*): Raises accuracy by 1 and reduces evasion by 1.
Exp. Go-Getter(2*): Targets foes that give more experience.
Nonsleeper (2*): Immune to all sleep-inducing/related moves.
Gap Prober (2*): Ranged moves and throwing items can pass allies without causing damage.
Energy Saver (2.5*): Belly lowers slower.
Defender (2.5*): Raises Defense and Special Defense by 1 but lowers Attack and Special Attack by 1.
Aggressor (2.5*): Attack and Sp. Attack raises by 1 and Defense and Sp. Defense are lowered by 1.
Trap Avoider (2.5*): Avoids visible traps only.
Lava Evader (3*): Avoids walking on lava.
Counter Basher (3*): Lowers Defense by 1, but sometimes counters the damage received back to the adjacent opponent.
Quick Healer (3*): Raises natural HP recovery.
Counter Hitter (3.5*): Sometimes counters 1/4 of the damage received back to the adjacent opponent.
Multitalent (3.5*): Adds 5 to Pokemon's max PP.
Exp. Elite (3.5*): Earns more experience when defeating foes.
Sharp Shooter (3*): Raises critical-hit ratio.
Erratic Player (3.5*): Increases multiplier effect of type-effective damage.
Clutch Performer (4*): Raises evasion by 2 when under 25% of max HP.
All-Terrain Hiker (4*): Can walk on water, lava and valleys.
Critical Dodger (4.5*): Immunity to critical hits.
Trap Buster (4.5*): Sometimes destroys traps by stepping on them.
Sure-Hit Attacker (5*): Regular attacks do not miss.
Stair Sensor (5*): Learns the location of stairs when changing floors.
Extra Striker (5.5*): Sometimes strikes again following an attack.
Quick Dodger (5.5*): Raises likelihood of dodging attacks.
Fast Friend (5.5*): Raises chances of recruiting foes.
Trap Seer (6*): Able to step on traps without setting off.
Intimidator (6*): Sometimes makes foe cringe when they attack.
No-Charger (6*): Automatically uses charged attack without delay at the cost of 2PP.
Map Surveyor (6*): Knows the floor layout.
Quick Striker (7.5*): Can do two regular attacks in one turn in a row.
House Avoider (8*): Will not enter Monster Houses.
Pierce Hurler (8.5*): Throwing items penetrate Pokemon and keep flying.
Natural Gifter (9*): Extends effects of seeds and berries to Pokemon's allies. Only for leader.
Time Tripper (9.5*): Raises initial Speed by 1.
Absolute Mover (10*): Can move through water, lava, and valleys. Walls can be crushed.
Please remember: Individual Pokemon do not learn all of these IQ skills as they are placed under an IQ group that only has some of these IQ skills.
IQ Groups *COMPLETE*
Group A:
Group B:
Group C:
Group D:
Group E:
Group F:
Group G:
Group H:
Group I:
Group J:
Tactics
Let's go together (Level 1) - Follows the leader
Go after foes (Level 1) - Follows the leader but not when enemies are nearby.
Avoid the first hit (Level 1) - Follows leader; stays one tile from enemies.
Wait there (Level 10) - Does not move.
Get away from here (Level 15) - Avoids enemies and won't attack.
Go the other way (Level 20) - Wanders and approaches seen enemies.
Be patient (Level 30) - Follows leader but does not move when under 50% of max HP.
Avoid trouble (Level 35) - Follows leader but flees enemies when under 50% of max HP.
This is not the PMD help thread. This is not the Wonder Mail request thread. This is not the Recent Happenings thread. In fact, this is to lessen the amount of "help" posts in this forum. yarly, anyone will report you if they have to because we have threads for these! USE THE CORRECT THREAD INSTEAD!
Let's not spam this thread up like back in 2006 with Meganium Ex's and my PMD1 Strategy Guide. It's the main reason why Erik closed it.
The Recruit Dex is incomplete. The new 4th generation Spin-Off dex made this section obsolete because it lolcame out before I could complete this. But, oh well, lazy person's reference.
Sorry, the official guide isn't that generous, so we're not 100% accurate on our lists. The rest is based on what I and your generous fellow SPPf members experienced from game play. There may be a few things to add to the guide, so notify me via PM.
INDEX
Introductory and Miscellaneous things
Miscellaneous continued, Personality Quiz Guide, Boss Battle Strategies, Attack Dex(IMAGE FILE WARNING)
Recruit Dex by Dungeon *INCOMPLETE* and Wonder Mail section(PLEASE READ)
Starting the Game With Your Partner
When beginning your game, you start out with a personality quiz. You are requested to answer them honestly, but not all people would do so! Especially when the results of the test lean towards the Pokemon you will become in the game. In this game, there are no gender exclusive Pokemon. That means all 16 starter Pokemon are available to males and females.
You get to choose your partner. The partners are apparently the other starters. You may not choose any Pokemon of your type or of a Normal type. Also, there seems to be changes in options with choosing partners as well.
Selecting a partner (just click it once; don't OK it) then going back to the partner menu will result in a different list. Every time, two of the total number of partners will be missing. There seems to be a certain pattern as well. For example, sometimes the 3rd generation starters will be missing.
Auras
After you are told who you are most like, you will be asked to place your finger on the touch screen and hold it there so they can get your aura. However, the stylus would work fine as it will all do the same thing. Your aura is [most of the time, but not always] based on the color of the main menu of your DS start-up screen. Bonuses will be granted if you have a colored ribbon matching your aura. Others will be useless.
List of Auras:
A Refreshing Green
A Vivid Pink
A Mystic Purple
A Subdued Brown
A Cool Sky Blue
A Clear Aqua Blue
A Gentle Mint Blue
A Stunning Orange
An Uplifting Pink
An Energetic Yellow
An Elegant Violet
A Brilliant Green
A Stately Silver
A Deep Green
A Smart Marine Blue
A Fiery Red
Rescue Missions and Your Team Rank
When you begin the game you’ll be at Normal Rank, the lowest rank possible because you just started your rescue team. There will also be a low amount of items you are allowed to hold in the Kangaskhan Storage. You can then begin getting missions from the bulletin boards located in the Guild’s first Sublevel.
The left board is just like PMD1: rescue missions, escorts and possibly new dungeons to be unlocked. The right one are missions where you find and defeat outlaws and receive the bounty on their head. The Poke money prizes may seem a lot, but you only get ten percent of the money. Completing a mission will always earn you “Rescue Points”. The more points you earn the higher in rank your rescue team will become.
Rank: Points needed | items allowed in Storage
Normal Rank: - | 64 items
Bronze: 100 rescue points | 96 items
Silver: 400 rescue points | 200 items
Gold: 1600 rescue points | 320 items
Diamond: 3200 rescue points | 480 items
Super: 6000 rescue points | 560 items
Ultra: 10000 rescue points | 640 items
Hyper: 15000 rescue points | 800 items
Master: ? | 1000 items
Secret Rank: After you graduate, do a job and then go on to the second morning. Then, talk to Mr. Mime and rescue Scizor from the Crevice Cave to be granted Secret Rank.
Dungeon Information
Each dungeon has a set amount of floors each. When you go into the same dungeon several times, you notice that the layout is different even though they were in the same dungeon. That's because the floors are changed each time to add challenge to the game.
Each space that you move onto is considered a turn. Your foes will then take their turn. If you meet and then have to fight against an enemy Pokemon, you will take turns just like previous games except you always go first. However, between each turn you can take a moment to think of what you’ll do next, whether to move during the fight, or use an item. Attacking, moving, and item using uses up a turn.
Partners can also be set to a certain tactic. If you go and select your Pokemon through the menu under the “Team” section", you then go to “Tactics” and choose what you want them to do. They can go and chase enemy Pokemon, stay where they are, or more.
Another part to maneuvering through dungeons is the hunger which is displayed on the opening section of your menu. Moving around too much can make your Belly drop down. When your “Belly” status starts to get low, you will be told you’re getting hungry and that you need to eat. Otherwise you’ll begin to lose 1 HP per turn and eventually could faint in the dungeon.
Certain items are essential when traveling through a dungeon. Items like the Oran Berry to heal your HP and Apples are essential for filling the “Belly” of your Pokemon. Pecha, Rawst, and Cheri Berries can heal certain status like paralysis while Gravelrocks and Blast Seeds can harm other Pokemon. Rare items like Reviver Seeds and Max Elixirs are also crucial in certain situations, so it is important to stock up before entering a dungeon.
If the rescue team leader faints in the dungeon, then you will be immediately transported out of the dungeon with a failure. This will result in you losing half your items and all your money that you have with you, so save your game often. However, the SOS option allows you to prevent this and will become available soon after starting the game.
Recruiting Pokemon
At your Guild’s first Sublevel, there is a desk at the bottom right. After you complete the mission at Waterfall Cave, Chimecho will open a “Chimecho Assembly” where you will be able to put Pokemon you have recruited on your team or on standby.
With the release of PMD2, there is a new system of recruiting Pokemon. Sadly, it has become quite easier. As some people notice, evolutions of Pokemon can now be recruited at an easier rate than in PMD1. No Friend Areas are required as well. You do not need any spaces in your party as the Team Badge will return them to Treasure Town. If you do have a slot and recruit a Pokemon, they will accompany you for the rest of the dungeon. Even if they faint, they will go back to Treasure Town and they will still be on your team.
However, things have not changed still. You, as the leader, must land the final blow on the Pokemon for there to even be a chance for it to be recruited. You also must be adjacent to the Pokemon whether it be diagonal or directly in front.
SOS Process
If you happen to faint in a dungeon, you would normally lose some items and all your money. You can prevent that situation by sending an SOS distress call. Your game will be Quicksaved then you'll be at the main menu. When being rescued by someone, DO NOT resume gameplay, because that is only for when you're giving up on being rescued.
When sending an SOS, go to "Friend Rescue" then choose “Get Help”, and you will then be able to choose Wireless, Wi-Fi, or Password. Either way you will be sending an SOS so that somebody may rescue you. When the rescuer receives the mail, they may start rescuing you by going to the “Friend Rescue” option in the main menu, then to “Rescue Mail” and then “Receive SOS Mail.” From there, they will be able to choose their method of receiving mail. The rescuer will then go to “Go Rescue” option in the main menu and perform their duties there. The rescuer must go up the same dungeon with the same floor layout and try to get to the floor you fainted on. When they reach the floor you fainted on, they must find a "Rescue Point" which is a red flag square tile.
When your rescuer sends an A-OK mail via Wireless, Wi-Fi or Password, you are allowed to revive your team by going to "Friend Rescue" then “Get Help” then "Recieve A-OK". If it is by password, you must go to "Friend Rescue" then "Recieve A-OK" then type in the password that was given. You can send a Thank-You mail right away to the rescuer with an item in your Storage or not or you can send it afterwards. When you're done recieving A-OK mail, you may resume your game with all your items and money.
Wonder Mail
Wonder Mail is the code you can use to obtain or give missions via Password or Wi-Fi. When you start up the game, select "Wonder Mail" and input the code or prepare for communication, then you immediately receive a new mission added to your job list. There are a few missions that can only be obtained through Wonder Mail and these special missions come with unique rewards like unlocked Pokemon, or unlocked dungeons.
If you want to give someone the Wondermail code to a mission, just copy down the Wondermail password of the mission by looking at the Mission Info before accepting the mail. Then give that code to the person. They can put it in and receive the mission too.
Evolution Process
You are not able to evolve until after graduating from the guild. After you accomplish that, you continue on as you stumble upon a pond where the evolution processes take place. Apparently, your starter and partner will not be able to evolve until you unlock Marine Resort. That is only part of the storyline.
Gummis
Gummis play an important role in the game. It makes the Pokemon eating the Gummi smarter, thus raising IQ. You might even gain IQ skills. If you want to switch IQ skills, you go to the Pokemon's information then go to the IQ List, then set an IQ skill. Dual type Pokemon gain IQ much faster than single type Pokemon. Also, benefits of feeding a Pokemon a Gummi will raise stat point(s) as well as IQ and Belly.
Pokemon Types that like certain Gummis
Black: Dark
Blue: Water
Brown: Ground
Clear: Ice
Gold: Psychic
Grass: Grass (Ironic)
Gray: Rock
Green: Bug
Orange: Fighting
Pink: Poison
Purple: Ghost
Red: Fire
Royal: Dragon
Silver: Steel
Sky: Flying
White: Normal
Yellow: Electric
*Note: Wonder Gummis raise the IQ of all types
PMD2 and PMD1 Differences
As some of you may have [obviously] noticed, there are differences in PMD2 compared to PMD1. This will be split up into subsections explaining these differences.
lulz. My Torchips follows my Treekipz.
After you finish the storyline in PMD1, your partner does not follow you anymore and you may walk as your current team leader in town. However, in PMD2, your partner follows you every time and even though you may have team leaders changed, you will still be your starter.
Well, there's the evolution place, but I can't evolve yet!
When Luminous Cave came out in PMD1, you could just evolve any Pokemon under the qualifications. In PMD2, you can't evolve your starter and partner for a reason and you must recruit Palkia
Sentry Duty!
PMD2 has a minigame! A mediocre one at best, lulz. There are six Pokemons' footprints you have to identify. Four choices are presented to you and you are pressed under a time limit. Sure, you can look up the footprints in a Pokedex or something, but there's still a time limit and more points would be rewarded. Just keep practicing. Sentry duty is a great way to gather up some Poke or Reviver Seeds you may need.
I want that IQ skill! ):
There's the possibility that you know it takes 'x' stars of IQ to get that IQ skill you've wanted, and you're already there! However, each Pokemon falls under a specific IQ group which means they will only learn certain IQ skills. In total, there are ten groups.
Miscellaneous
Dungeon Floors
Beach Cave: 4 + 1
Drenched Bluff: 6
Mt. Bristle: 9 + 1
Waterfall Cave: 8
Apple Woods: 12
Side Path: 5
Craggy Coast: 9
Rock Path: 5
Mt. Horn: 14
Forest Path: 5
Foggy Forest: 11
Steam Cave: 8 + 7 + 1
Amp Plains: 10 + 9 + 1
Northern Desert: 15
Quicksand Cave: 10 + 10 + 1
Crystal Cave: 11
Crystal Crossing: 13 + 1
Chasm Cave: 8
Dark Hill: 15
Sealed Ruin: 8 + 6 + 1
Dusk Forest: 8
Deep Dusk Forest: 12
Treeshroud Forest: 20
Brine Cave: 9 + 5 + 1
Hidden Land: 15 + 8 + 1
Temporal Tower: 13 + 10 + 1
Serenity River: 7 + 1
Landslide Cave: 12 + 1
Lush Prairie: 5 + 1
Tiny Meadow: 4 + 1
Oran Forest: 4 + 1
Mystifying Forest: 13 + 1
Blizzard Island: 20
Crevice Cave: 10 + 4 + 1
Surrounded Sea: 19 + 1
Miracle Sea: 18 + 4 + 1
Aegis Cave: 3 + 1 + 3 + 1 + 4 + 1 + 5 + 1
Mt. Travail: 19
The Nightmare: 17
Spacial Rift: 15 + 9 + 1
Dark Crater: 15 + 14 + 1
Concealed Ruins: 29 + 1
Marine Resort: 18 + 1
Lake Afar: 24 + 1
Happy Outlook: 19 + 1
Mt. Mistral: 19 + 1
Shimmer Hill: 17 + 1
Lost Wilderness: 17 + 1
Midnight Forest: 24 + 1
Last Maze: 48
Zero Isle North: 74 + 1
Zero Isle East: 39 + 1
Zero Isle West: 39 + 1
Zero Isle South: 98 + 1
Chapter Log *SPOILER WARNING*
Chapter 1
A Storm at Sea
Pokemon: Koffing and Zubat
Dungeons: Beach Cave
Pokemon: Koffing and Zubat
Dungeons: Beach Cave
The New Guild Recruits
Pokemon: Wigglytuff and Chatot
Dungeons: Drenched Bluff
Pokemon: Wigglytuff and Chatot
Dungeons: Drenched Bluff
The Scream
Pokemon: Drowzee and Azurill
Dungeons: Mt. Bristle
Pokemon: Drowzee and Azurill
Dungeons: Mt. Bristle
The Gatekeepers
Pokemon: Loudred and Diglett
Pokemon: Loudred and Diglett
The First Official Exploration
Pokemon: Torkoal
Dungeons: Waterfall Cave
Pokemon: Torkoal
Dungeons: Waterfall Cave
Team Skull
Pokemon: Skuntank, Koffing and Zubat
Dungeons: Apple Woods
Pokemon: Skuntank, Koffing and Zubat
Dungeons: Apple Woods
The Guild's Big Expedition
Pokemon: Wigglytuff Guild
Dungeons: Side Path, Craggy Coast, Rock Path, Mt. Horn
Pokemon: Wigglytuff Guild
Dungeons: Side Path, Craggy Coast, Rock Path, Mt. Horn
Groudon's Heart
Pokemon: Corphish
Dungeons: Forest Path, Foggy Forest
Pokemon: Corphish
Dungeons: Forest Path, Foggy Forest
The Mystery of Fogbound Lake
Pokemon: Groudon and Uxie
Dungeons: Steam Cave
Pokemon: Groudon and Uxie
Dungeons: Steam Cave
Dusknoir
Pokemon: Dusknoir
Dungeons: Amp Plains
Pokemon: Dusknoir
Dungeons: Amp Plains
Grovyle the Thief
Pokemon: Grovyle and Mesprit
Dungeons: Northern Desert, Quicksand Cave
Pokemon: Grovyle and Mesprit
Dungeons: Northern Desert, Quicksand Cave
The Only Option
Pokemon: Azelf
Dungeons: Crystal Cave, Crystal Crossing
Pokemon: Azelf
Dungeons: Crystal Cave, Crystal Crossing
Dusknoir's Secret
Pokemon: Dusknoir
Pokemon: Dusknoir
Into the Future
Pokemon: Dusknoir, Sableye, Grovyle
Dungeons: Chasm Cave. Dark Hill, Sealed Ruin
Pokemon: Dusknoir, Sableye, Grovyle
Dungeons: Chasm Cave. Dark Hill, Sealed Ruin
The Secret of the Planet's Paralysis
Pokemon: Celebi
Dungeons: Dusk Forest, Deep Dusk Forest
Pokemon: Celebi
Dungeons: Dusk Forest, Deep Dusk Forest
A New Dawn
Pokemon: Grovyle
Dungeons: Treeshroud Forest
Pokemon: Grovyle
Dungeons: Treeshroud Forest
The Guild's Crew
Pokemon: Torkoal
Pokemon: Torkoal
Lapras
Pokemon: Lapras, Kabutops, Omastar
Dungeons: Brine Cave
Pokemon: Lapras, Kabutops, Omastar
Dungeons: Brine Cave
To the Hidden Land
Pokemon: Lapras
Dungeons: Hidden Land
Pokemon: Lapras
Dungeons: Hidden Land
The Last Adventure
Pokemon: [Primal] Dialga
Dungeons: Temporal Tower
Pokemon: [Primal] Dialga
Dungeons: Temporal Tower
Guild Graduation
Pokemon: Wigglytuff Guild
Dungeons: Mystifying Forest
Pokemon: Wigglytuff Guild
Dungeons: Mystifying Forest
Scizor the Explorer
Pokemon: Mr. Mime and Scizor
Dungeons: Blizzard Island, Crevice Cave
Pokemon: Mr. Mime and Scizor
Dungeons: Blizzard Island, Crevice Cave
Manaphy
Pokemon: Manaphy and Phione
Dungeons: Surrounded Sea, Miracle Sea
Pokemon: Manaphy and Phione
Dungeons: Surrounded Sea, Miracle Sea
The Aegis Cave
Pokemon: Regice, Regirock, Registeel, Regigigas, Team Charm
Dungeons: Aegis Cave
Pokemon: Regice, Regirock, Registeel, Regigigas, Team Charm
Dungeons: Aegis Cave
Azurill's Nightmare
Pokemon: Drowzee, Cresselia, Palkia
Dungeons: Mr. Travail, The Nightmare, Spacial Rift
Pokemon: Drowzee, Cresselia, Palkia
Dungeons: Mr. Travail, The Nightmare, Spacial Rift
Adventurers Again
Pokemon: Darkrai
Dungeons: Dark Crater
Pokemon: Darkrai
Dungeons: Dark Crater
Manaphy's Return
Pokemon: Manaphy
Pokemon: Manaphy
Adventure Log List *SPOILER WARNING*
1/6
? Pokemon that joined you.
? Kinds of Pokemon battled.
? Moves were learned.
? Kinds of items acquired.
? Dungeons cleared.
? Times fainted in dungeons.
? Friends were helped.
? Thieving attempts succeeded.
2/6
? Pokemon evolved.
? Pokemon Eggs hatched.
? Record # of one-floor victories.
Discovered the Hot Spring.
Discovered the Fogbound Lake.
Returned from the future.
Prevented the planet's paralysis.
Graduated from Wigglytuff's Guild.
3/6
Solved the mystery of the Aegis Cave.
Stopped the evil ambition of Darkrai.
All training completed.
Zapdos joined the team.
Moltres joined the team.
Unown joined the team.
Raikou joined the team.
Entei joined the team.
4/6
Suicune joined the team.
Lugia joined the team.
Ho-Oh joined the team.
Regirock joined the team.
Regice joined the team.
Registeel joined the team.
Latias joined the team.
Latios joined the team.
5/6
Jirachi joined the team.
Deoxys joined the team.
Uxie joined the team.
Mesprit joined the team.
Azelf joined the team.
Dialga joined the team.
Palkia joined the team.
Regigigas joined the team.
6/6
Cresselia joined the team.
Fione joined the team.
Manaphy joined the team.
Darkrai joined the team.
Some of these were picked up from people that translated the Japanese version, so they may or may not be word-for-word. Just a note.
Traps
Mud Trap: Randomly lowers any stat except Speed by 1
Sticky Trap: Makes one of the items being held or in the Treasure Bag sticky and unusable.
Grimy Trap: The food in your Treasure Bag may become grimy.
Summon Trap: Enemy Pokemon are randomly placed in the room
Pitfall Trap: Receive damage and sent to the next floor
Warp Trap: You are warped to a random spot on the floor
Gust Trap: You're blown in a random direction in a set number of tiles
Spin Trap: Confused status
Slumber Trap: Sleeping status
Slow Trap: Lowers Speed by 1
Seal Trap: One of the moves cannot be used on the floor
Poison Trap: Poisoned status
Selfdestruct Trap: Inflicts half of your current HP as damage for the 8 tiles it covers
Explosion Trap: Inflicts half of your current HP as damage for the 24 tiles it covers
PP-Zero Trap: A random move of yours gets drained to 0 PP
Chestnut Trap: Receive 10 damage
Pokemon Trap: All items in the room turn into Pokemon
Spiked Tile: Receive 20 damage
Stealth Rock: Up to 1/8 of max HP is inflicted as damage
Toxic Spikes: Receive 10 damage and poisoned status
Trip Trap: Your held item is dropped
Weather Conditions
Cloudy: All moves except Normal-type deal 3/4 damage.
Fog: Damage from Electric moves are halved.
Hail: Non-Ice Pokemon receive 3 damage every 10 turns Activates Snow Cloak ability.
Rain: 1.5x damage for Water moves. Half for Fire moves.
Sasndstorm: Non-ground/rock/steel Pokemon receive 3 damage every 10 turns. Activates Sand Veil ability.
Snow: Ice Pokemon gain one Speed.
Sunny: 1.5x damage for Fire moves. Half for Water moves.
IQ Skills
Apparently, Pokemon are fit under different IQ groups which mean that they have certain IQ skills that some other Pokemon do not have access to. There are new IQ skills as well.
IQ skills common to all groups:
Course Checker (Base): Does not use attacks when a wall or ally is in the way.
Escapist (Base): The Explorer Badge can be used to leave the dungeon.
Item Catcher (Base): Can catch a thrown item to hold.
Item Master (Base): Can use and throw held item.
Exclusive Move-User (Base): Uses moves and not regular attack.
Nontraitor (0.5*): When confused or cowering, Pokemon will not attack friends.
Status Checker (0.5*): Does not use moves that inflict status that a foe may already have.
The Others:
Dedicated Traveler (Base): Moving is first priority over using attacks and items.
PP Saver (0.5*): Sometimes gets to use a move without draining PP.
Cheerleader (0.5*): Raises Attack and Special Attack of friends by 1.
Efficiency Expert (0.5*): Attacks Pokemon with the lowest HP first.
Acute Sniffer (0.5*): Lets you know the number of items on the floor.
Type-Advantage Master (1*): Raises critical hit rate of type-effective moves.
Brick Tough (1*): Permanently adds 10 to max HP.
Self-Curer (1*): Shortens required turns for Pokemon to heal from status.
Bodyguard (1*): Takes damage in place of friends who are low on HP.
Power Pitcher (1.5*): 1.5x damage inflicted with throwing items excluding Gravelrocks.
Survivalist (1.5*): Restores more Belly stat with foods and may not be affected by Grimy Foods.
Weak-Type Picker (1.5*): Targets foes with good type compatibility.
Wise Healer (1.5*): Raises effectiveness of HP-recovery moves/items.
Coin Watcher (1.5*): When Poke is picked up, 1.2x will be received instead.
Deep Breather (2*): Recovers 1PP to a random move upon entering the next floor.
Wary Fighter (2*): Steps back one tile when it misses a move.
Practice Swinger (2*): Raises attacks stats by 1 only for the turn after a move misses.
Hit-and-Runner (2*): Sometimes cancels foe's counter-attacks.
Concentrator(2*): Raises accuracy by 1 and reduces evasion by 1.
Exp. Go-Getter(2*): Targets foes that give more experience.
Nonsleeper (2*): Immune to all sleep-inducing/related moves.
Gap Prober (2*): Ranged moves and throwing items can pass allies without causing damage.
Energy Saver (2.5*): Belly lowers slower.
Defender (2.5*): Raises Defense and Special Defense by 1 but lowers Attack and Special Attack by 1.
Aggressor (2.5*): Attack and Sp. Attack raises by 1 and Defense and Sp. Defense are lowered by 1.
Trap Avoider (2.5*): Avoids visible traps only.
Lava Evader (3*): Avoids walking on lava.
Counter Basher (3*): Lowers Defense by 1, but sometimes counters the damage received back to the adjacent opponent.
Quick Healer (3*): Raises natural HP recovery.
Counter Hitter (3.5*): Sometimes counters 1/4 of the damage received back to the adjacent opponent.
Multitalent (3.5*): Adds 5 to Pokemon's max PP.
Exp. Elite (3.5*): Earns more experience when defeating foes.
Sharp Shooter (3*): Raises critical-hit ratio.
Erratic Player (3.5*): Increases multiplier effect of type-effective damage.
Clutch Performer (4*): Raises evasion by 2 when under 25% of max HP.
All-Terrain Hiker (4*): Can walk on water, lava and valleys.
Critical Dodger (4.5*): Immunity to critical hits.
Trap Buster (4.5*): Sometimes destroys traps by stepping on them.
Sure-Hit Attacker (5*): Regular attacks do not miss.
Stair Sensor (5*): Learns the location of stairs when changing floors.
Extra Striker (5.5*): Sometimes strikes again following an attack.
Quick Dodger (5.5*): Raises likelihood of dodging attacks.
Fast Friend (5.5*): Raises chances of recruiting foes.
Trap Seer (6*): Able to step on traps without setting off.
Intimidator (6*): Sometimes makes foe cringe when they attack.
No-Charger (6*): Automatically uses charged attack without delay at the cost of 2PP.
Map Surveyor (6*): Knows the floor layout.
Quick Striker (7.5*): Can do two regular attacks in one turn in a row.
House Avoider (8*): Will not enter Monster Houses.
Pierce Hurler (8.5*): Throwing items penetrate Pokemon and keep flying.
Natural Gifter (9*): Extends effects of seeds and berries to Pokemon's allies. Only for leader.
Time Tripper (9.5*): Raises initial Speed by 1.
Absolute Mover (10*): Can move through water, lava, and valleys. Walls can be crushed.
Please remember: Individual Pokemon do not learn all of these IQ skills as they are placed under an IQ group that only has some of these IQ skills.
IQ Groups *COMPLETE*
Group A:
Dedicated Traveler
Course Checker
Escapist
Item Catcher
Item Master
Exclusive Move-User
Nontraitor
Status Checker
Acute Sniffer
PP Saver
Type-Advantage Master
Survivalist
Coin Watcher
Nonsleeper
Lava Evader
Multitalent
Haggler
Collector
All-Terrain Hiker
Trap Buster
Stair Sensor
Map Surveyor
House Avoider
Pierce Hurler
Dedicated Traveler
Course Checker
Escapist
Item Catcher
Item Master
Exclusive Move-User
Nontraitor
Cheerleader
Status Checker
Type-Advantage Master
Bodyguard
Coin Watcher
Wise Healer
Deep Breather
Gap Prober
Nonsleeper
Lava Evader
Haggler
Trap Buster
Fast Friend
Course Checker
Escapist
Item Catcher
Item Master
Exclusive Move-User
Nontraitor
Cheerleader
Status Checker
Type-Advantage Master
Bodyguard
Coin Watcher
Wise Healer
Deep Breather
Gap Prober
Nonsleeper
Lava Evader
Haggler
Trap Buster
Fast Friend
Course Checker
Escapist
Item Catcher
Item Master
Exclusive Move-User
Nontraitor
Status Checker
Type-Advantage Master
Brick-Tough
Power Pitcher
Survivalist
Practice Swinger
Concentrator
Exp. Go-Getter
Nonsleeper
Aggressor
Lava Evader
Counter Basher
Erratic Player
Clutch Performer
Extra Striker
Intimidator
No-Charger
Pierce Hurler
Dedicated Traveler
Course Checker
Escapist
Item Catcher
Item Master
Exclusive Move-User
Nontraitor
Status Checker
PP Saver
Self-Curer
Practice Swinger
Concentrator
Gap Prober
Trap Avoider
Sharpshooter
Lava Evader
Counter Hitter
Clutch Performer
Critical Dodger
Stair Sensor
Quick Dodger
Extra Striker
Trap Seer
Quick Striker
Nontraitor
Cheerleader
Status Checker
Efficiency Expert
Brick-Tough
Bodyguard
Power Pitcher
Survivalist
Wise Healer
Deep Breather
Wary Fighter
Energy Saver
Defender
Quick Healer
Lava Evader
Counter Hitter
Sure-Hit Attacker
Intimidator
House Avoider
Cheerleader
Status Checker
Efficiency Expert
Brick-Tough
Bodyguard
Power Pitcher
Survivalist
Wise Healer
Deep Breather
Wary Fighter
Energy Saver
Defender
Quick Healer
Lava Evader
Counter Hitter
Sure-Hit Attacker
Intimidator
House Avoider
Course Checker
Escapist
Item Catcher
Item Master
Exclusive Move-User
Nontraitor
Status Checker
PP Saver
Type-Advantage Master
Self-Curer
Weak-Type Picker
Wary Fighter
Gap Prober
Hit-and-Runner
Sharpshooter
Lava Evader
Multitalent
Exp. Elite
All-Terrain Hiker
Trap Buster
Stair Sensor
No-Charger
House Avoider
Pierce Hurler
Course Checker
Escapist
Item Catcher
Item Master
Exclusive Move-User
Nontraitor
Status Checker
Acute Sniffer
PP Saver
Self-Curer
Practice Swinger
Exp. Go-Getter
Trap Avoider
Hit-and-Runner
Quick Healer
Lava Evader
Exp. Elite
Erratic Player
Critical Dodger
Stair Sensor
Map Surveyor
Trap Seer
Quick Striker
Escapist
Item Catcher
Item Master
Exclusive Move-User
Nontraitor
Status Checker
Acute Sniffer
PP Saver
Self-Curer
Practice Swinger
Exp. Go-Getter
Trap Avoider
Hit-and-Runner
Quick Healer
Lava Evader
Exp. Elite
Erratic Player
Critical Dodger
Stair Sensor
Map Surveyor
Trap Seer
Quick Striker
Course Checker
Escapist
Item Catcher
Item Master
Exclusive Move-User
Nontraitor
Status Checker
Efficiency Expert
Self-Curer
Brick-Tough
Bodyguard
Coin Watcher
Wise Healer
Deep Breather
Wary Fighter
Quick Healer
Lava Evader
All-Terrain Hiker
Critical Dodger
Trap Buster
Fast Friend
Quick Dodger
House Avoider
Natural Gifter
Course Checker
Escapist
Item Catcher
Item Master
Exclusive Move-User
Nontraitor
Status Checker
PP Saver
Self-Curer
Power Pitcher
Survivalist
Practice Swinger
Deep Breather
Exp. Go-Getter
Aggressor
Quick Healer
Sharpshooter
Lava Evader
All-Terrain Hiker
Quick Dodger
Extra Striker
Intimidator
House Avoider
Time Tripper
Course Checker
Escapist
Item Catcher
Item Master
Exclusive Move-User
Nontraitor
Status Checker
Weak-Type Picker
Practice Swinger
Concentrator
Wary Fighter
Gap Prober
Energy Saver
Defender
Hit-and-Runner
Lava Evader
Mulitalent
Sure-Hit Attacker
Stair Sensor
Intimidator
Map Surveyor
House Avoider
Absolute Mover
Escapist
Item Catcher
Item Master
Exclusive Move-User
Nontraitor
Status Checker
Weak-Type Picker
Practice Swinger
Concentrator
Wary Fighter
Gap Prober
Energy Saver
Defender
Hit-and-Runner
Lava Evader
Mulitalent
Sure-Hit Attacker
Stair Sensor
Intimidator
Map Surveyor
House Avoider
Absolute Mover
Tactics
Let's go together (Level 1) - Follows the leader
Go after foes (Level 1) - Follows the leader but not when enemies are nearby.
Avoid the first hit (Level 1) - Follows leader; stays one tile from enemies.
Wait there (Level 10) - Does not move.
Get away from here (Level 15) - Avoids enemies and won't attack.
Go the other way (Level 20) - Wanders and approaches seen enemies.
Be patient (Level 30) - Follows leader but does not move when under 50% of max HP.
Avoid trouble (Level 35) - Follows leader but flees enemies when under 50% of max HP.
Last edited:

")